Sunday 20 December 2020

OM 01 Project - Front Bracing

The front bracing is much more complicated than the back, which is why I did the back first! 

The plans in the Kinkead book are very comprehensive and full size - you need to transfer the positions of each brace onto the inside face of the top.

There are a few ways to do this but I opted to photocopy the plans, then tape the four A4 sections together into 1 piece, before cutting small slots at the end of each brace position with a craft knife, so I could mark through onto the wood.


After taping the plan onto the back (using the soundhole and centreline as datums), it was easy to mark the ends and then "join the dots" to transfer all of the positions across. (Remember, the top plate is oversize at this point - it will be trimmed down to it's final shape and size after being joined to the sides.)


The front is given a two dimensional camber by forming the surfaces of the main braces into gentle convex curves with a relief of up to about 3mm. This was done in the same way as for the back braces. 

Then the lap joint needs to be formed for the main cross bracing. By laying out the two pieces on the plans, I could mark the junction and cut the notch out of the bottom half. Then, by letting the top half into the rebate I had cut,  I could mark the matching rebate in the top bracing so that the correct intersection angle was formed. 


I glued the joint and then smoothed the joint face down so that the glueing surface was flush against the soundboard. Then I could lay out the rest of the braces to check all of the positioning was right.


I pre-formed the chamfered ends on each of the braces using the belt sander. I also formed small notches where each of the finger braces intersects the main braces to help them locate firmly. You can just see them in this picture below - they are only 2mm deep but will really help to lock the whole "system" of bracing together.


If I was building lots of guitars, I could build an elaborate, cambered jig to glue all of the bracing at once. But my "shed at the bottom of the garden" method was to glue the main, pre-cambered braces first, so that the soundboard took on the dome shape, and then glued the finger braces in 3 or 4 successive stages. I guess that the camber might not be quite as precise this way but it feels like a 1% difference thing to me.


The photos below show the flat bracing plates being glued around the soundhole and above the main brace.


Finally I glued a small capping across the X-brace joint. This puts back the strength that is lost from this critical area by forming the lap joint. Some guitars use a glued linen patch at this point but I liked the idea of a cohesive carved arch.


This is the soundboard after all of the bracing is installed. The only part still to glue on is the bridge plate - I'm waiting for some maple to be delivered to make this.


The next part was exciting and scary in equal measure! Carving the braces to their final shape. I have followed the plans closely for this, although an experienced luthier would be guided by the "tap tone" of the wood as successively more wood is removed. With my wonky hearing, I doubt that I could discern any difference!

I used a combination of chisels and block plane. Most of the braces were 2-3mm higher than their design height, so there is a fair amount of wood to remove. The pictures tell the story really.


Once the rough shapes were formed, I used progressively finer grades of sandpaper to form the final shapes.


So now I have both top and bottom completed. The next scary instalment is the bending of the sides 😰.



Saturday 12 December 2020

A lesson in Consumerism and Engineering

During my luthiering exploits, my favourite machine has definitely been the bandsaw that I bought. It's just such a versatile piece of kit. But the one I bought was pretty second hand and the more I've used it, the more frustrated I've become with some of it's shortcomings.

Four main things have started to pee me off:

Firstly, every time I need to change the blade, I have to take the front cover off. That isn't a terrible thing in it's own right but I have to undo two allen headed bolts; find the allen key etc and it feels like I'm deconstructing it. Petty I know but there you go!


Then the table is really crappy. Very lightweight and it doesn't sit straight across the slot for the blade.


The fence is ludicrously small (less than about 3/4" tall) and, as you clamp it, the adjustment changes so it's really hard to cut to a precise width and to hold timber accurately perpendicular to the blade.


Finally, the dust extraction port is pathetic - tiny and in such a stupid position that there isn't actually room to connect anything to it!


I decided that, if I am to produce instruments of any quality, then I need something that I can use with more precision and accuracy, so decided a new machine was in order! I started looking around and settled on one of the bandsaws  from Axminster or Record Power - the ones similar size to mine and receiving the best reviews were around £600 but I decided that it would be a once in a lifetime purchase so happy to pay it.

Once I tried to actually buy one, I realised that you can't actually get one at present (Nov/Dec 2020) as everything is on about a 3 month waiting list. This is all due to increased demand from Covid - everyone is investing in hobbies instead of going on holiday - and also the current global shipping crisis of ships and containers being in the wrong place in the world due to all the Covid disruption.

So I re-evaluated, and thought that, actually, I don't NEED a new bandsaw. I just need to fix the things I don't like about this one 😀

First thing to fix was those allen bolts. Amazingly, I found some scrap parts off a similar bandsaw for sale about 10 miles away for £5. Included on those parts were two captive knobs that I thought I could probably use to replace the captive allen bolts. This is the original bolt: 


... and this is the scrap part. Great, but it's missing some bolt sticking out of it!


So I found an 8mm coachbolt in the box of bits and cut two 40mm long sections, then screwed them into the knobs, after smearing the threads with some epoxy to lock them in place.


Much better - now I don't need to grub around for an allen key! Total cost so far £5.


Next job was to improve the dust extraction. I've been making vacuum adaptors for all of my workshop stuff out of uPVC rainwater pipe, so I thought that I could maybe use a pipe fitting to improve this. I got this joint, and cut it down in length a bit so that it wouldn't protrude too far into the machine. Then used a hole saw and file to make an appropriately sized hole in the back of the saw, just behind where the blade comes off the table.


I cut off the old outlet and just used some duct tape on either side to seal the opening, as it's not visible.


Then I mixed up some epoxy and smeared it around the joint surface fairly liberally to make sure it would fill the gap properly


Perfect! and you can see here how much more suction I can get. That fix cost £1.50 - total so far £6.50.


Next up is the flimsy table. I decided to plate it either side with an 18mm MDF "sandwich". The underside took some working out to clear all the mountings etc and I needed to chamfer the edges so it didn't interfere with the body. I bolted it all together after drilling though the MDF and aluminium table, using countersunk 6mm bolts. 


At some point, I'll rout a channel into the new top so that I can use my mitre gauge off the bench saw to make accurate angle cuts (actually that was another irritation - the weedy slot in the existing table wasn't big enough for either of the mitres that I have! So I'll be fixing 5 things!) The MDF and bolts cost about £15 - total so far £21.50.

You can see in the picture above that I made the top about 20mm longer at the front and have pre-drilled 4 extra holes - this is for improvement #4 which is a replacement fence. I bought this from Axminster and it is much more substantial and better engineered than the standard one. 


Here you can see the old and new side by side.


The carrier attaches using 4 more countersunk bolts and I used wing nuts so that I can easily remove it to change blades. The carrier also bridges the slot in the table, to keep everything flat there. The slide and cam locking mechanism is a massive improvement.


I attached and calibrated the scales so they can be used with the fence on either side of the blade.


I still need to set the fence up square - it's almost perfect but just needs a tiny bit of adjustment. Straight away though, I can cut this veneer less than 1.5mm thick off a scrap piece of sapele. This is such a huge improvement!


The new fence cost £25 - total altogether £46.50! 

I am so delighted that I did this - I'm sure that it will now be perfectly good for what I need. We are so ingrained to "consume" and my default was to buy something better but not only have I saved myself £550, I've also saved that resource and air miles etc in replacing something that I didn't need to. Plus, I enjoyed the  process of engineering fixes to each problem.


Sunday 29 November 2020

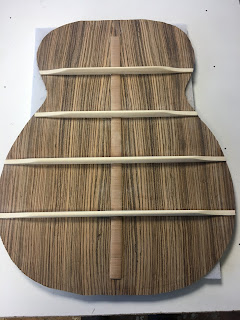
OM 01 Project - Back Bracing


The back has 4 braces glued to give it strength and also a slightly curved profile. The braces have been cut from quarter sawn spruce, so that the grain runs vertically in cross section, to give the greatest resistance against bending.

The glue face of each brace is cambered to between 1.8 and 3mm, using a plane. I used a couple of panel pins and a flexible batten to mark out the curve. A chamfer is cut into each end of each brace - this will be refined later, but helps to make sure you glue it in the right way up at this stage!


The back is marked out to show the position of each brace, being careful to make sure they are at right angles to the centreline.


And then the centre reinforcing strip is scored down each side of each brace, with a sharp craft knife, and the surplus removed with a chisel, being careful to get a nice tight fit between the reinfoircing strip and each brace.


Then the braces are glued in. I did it in two phases as I didn't have enough clamps to do it all at once. That also meant I had a bit more space to work in. It's hard to get in to clean up the squeezed out glue but worth persevering, as it's a much neater finish if you can get it all off!


I left all of that to cure for a few hours and then repeated for the remaining two braces.


That all feels a bit stronger now. But looks a bit ugly.


I protected the back with some card and then planed the braces down to size and with an arched profile. Then I used the belt sander to add in a nicer chamfer at the end of each brace.....


... before hand sanding down to the final shape. I protected the reinforcing strip with tape so I didn't change the profile of that at all.


I'm really pleased with the end result and it's great to have the first "component" finished.