The idea of making a caul is to spread the clamping load more evenly across the fingerboard when it's being glued. In the sketch below, the clamping force spreads out from the clamp at 45 degrees and you can see from the red arrows that the force is spread out over a bigger area on the left where the caul is in place, compared to on the right where the clamp is applied directly to the fingerboard.
I have just used some scraps of softwood I had lying around and cut a piece to match the size of the fingerboard, which is slightly narrower at the nut end than at the soundhole end. Maybe this was a bit over the top in hindsight, as it could have just been made to the maximum width, but I wanted to get the clamping forces as close to the edge of the fingerboard as possible.
I cut some 3mm thick cork and clued it to the underside, to protect the fingerboard.This picture shows it clamped up while glueing.
Next I trimmed off the excess with a stanley knife and sanded the edges flush on the belt sander.
I needed to rebate the cork so that it would press on the fingerboard and not the fret wires. So that I could draw the positions of the frets on perpendicular, I used the tapered piece of wood I had trimmed off the caul, so that I could use a square to mark off.
These next 2 pictures show the tapered neck width and also how much of a kick up there is in the neck!
Next stage is to mark the positions of the frets, then cut away the cork in each location using the mitre block to keep it all square
When this is clamped up, the forces will be applied directly to the fingerboard and not to the frets.
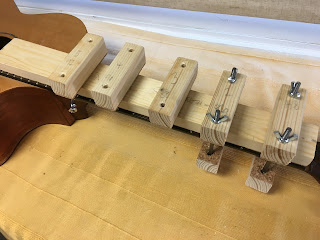
So, with the caul complete, I need to make the clamps that will hold it against the neck. There will be five of them and they get progressively wider as they go down the neck. This is what the finished product will look like.
Similar process as for the caul, I cut the wood to size (about 25mm square) and then clamped and glued cork to one surface.
Then I used the bandsaw to cut into 5 matching pairs.
This next photo shows the difference between shortest and longest. Not a lot and I'm not sure I'd bother if I was doing it again.
Then I marked up matching holes for the clamp bolts and drilled through each matching pair.
I used 5mm threaded rod to make the clamping bolts, and wing nuts for quick adjustment. This is what they'll look like when in place.
All together, it took an afternoon and less than £10 worth of bits and pieces, but should be a much more effective system than the 1st attempt - a reminder of how this looked:


No comments:
Post a Comment